Chapter 6
Writing articles
Click a document name to open the editor.
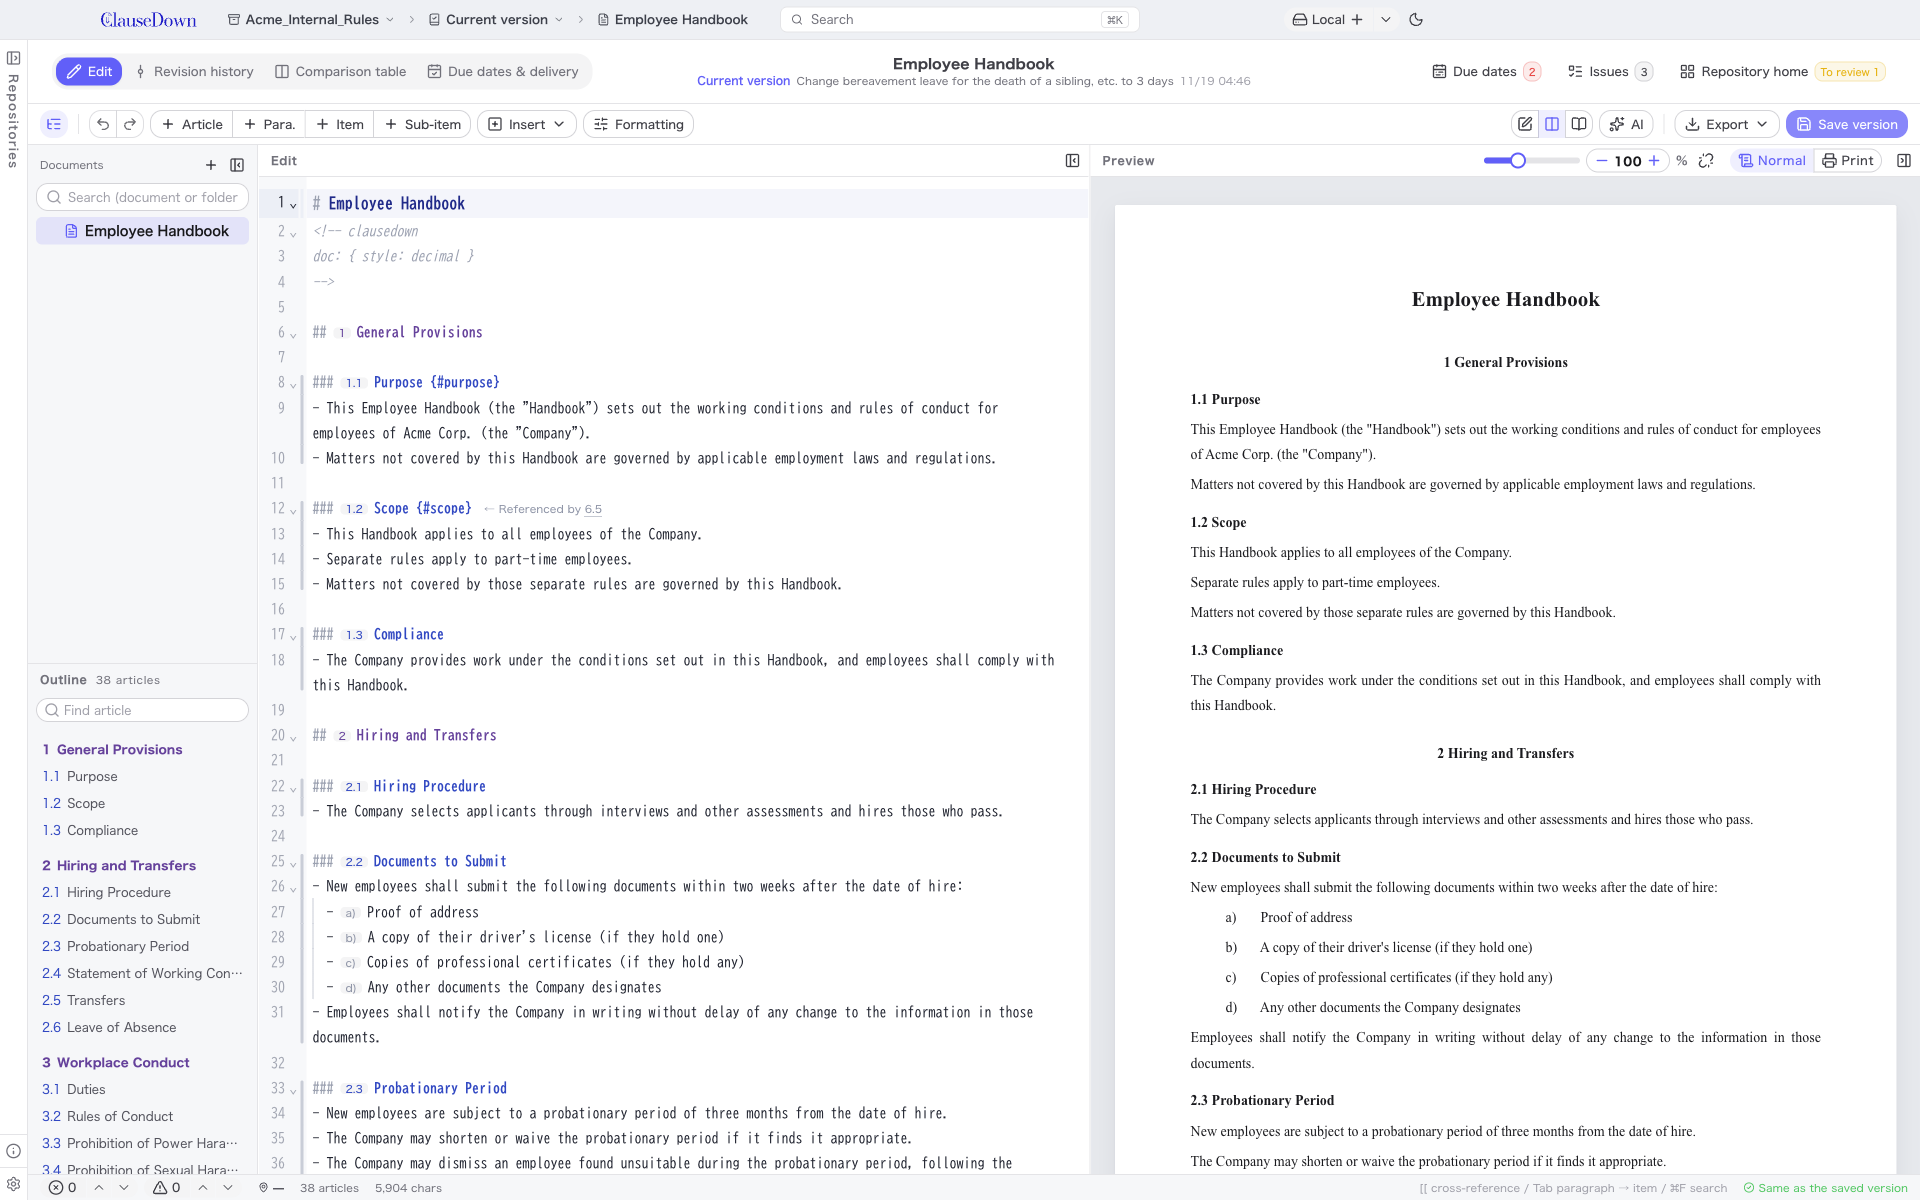
The editor is divided into three areas, from left to right.
- Documents and outline: The upper part lists the documents in the repository; the lower part is the outline (chapters and articles) of the open document. The document list uses the same tree as the folders in the repository home, and expanding or collapsing a folder applies to both. Click an article in the outline to jump to it. Type in the box above the outline to filter articles by heading.
- Edit: Where you write the text.
- Preview: How the document will look when printed. Use the switch to the right of the heading to choose Normal or Print.
- Normal: Shows the text on one long sheet. When you move the cursor in the editor, the preview follows to the same place.
- Print: Shows the document split into pages, exactly as it will be exported to PDF. Use this to check page breaks, margins and page numbers. The view is rebuilt about one second after you stop typing.
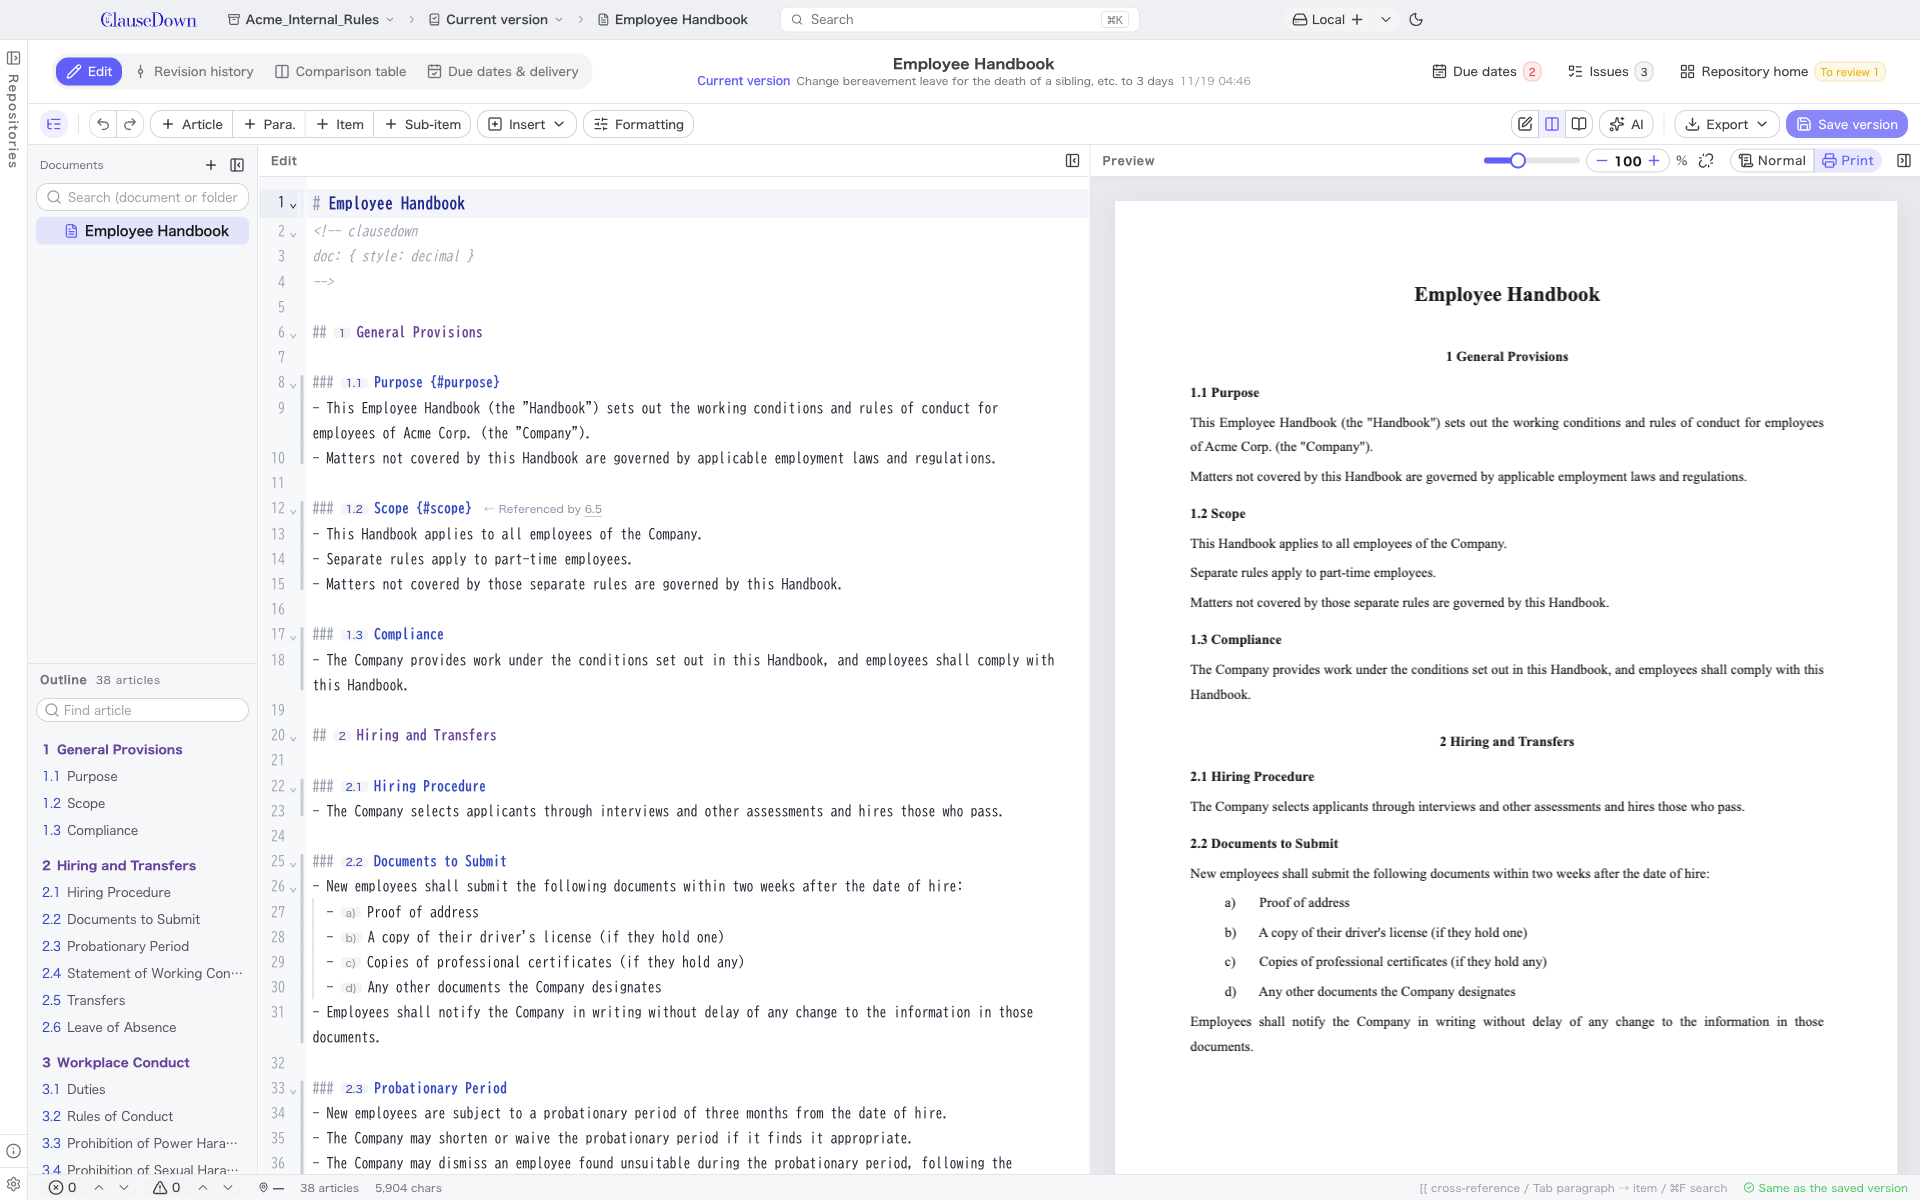
Hold Ctrl and turn the mouse wheel over the editor to change the editor's font size (the same setting as the font size under Editor in Settings). Do the same over the preview to change the preview zoom in 10% steps. You can also change the zoom with the slider and number box to the right of the preview heading; the box accepts values from 50 to 200 in 1% steps. Turn on the chain button to its right (Sync zoom with the editor) to zoom both panes by the same number of steps when you zoom one of them. This does not make the two sizes equal; each moves from its current size, one step being 1px for the editor and 10% for the preview. Both sizes are kept until the next time you start the app.
At the top of the screen are the Edit, Revision history, Comparison table and Due dates & delivery tabs, with the editing tools below them. Click Repository home at the right end of the tab row to go to the repository home. If someone has asked you to review a draft, the button shows the number of drafts awaiting review. Click Issues to its left to go to the issues screen (it shows the number of open issues). When the window is narrow, the Insert, Formatting, Export and Discard changes buttons are shown as icons without text. Hover over an icon to see its name.
Writing articles, paragraphs and items
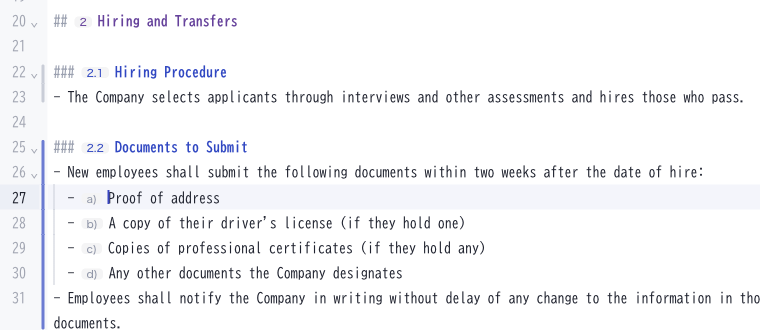
In the editor, the symbol at the start of each line tells the app what kind of element the line is. Do not type the numbers: they are assigned automatically. The app calculates the numbers and shows them faintly at the start of each line.
The examples below use the Japanese format, where articles are numbered 第1条, items 一, 二 (Japanese numerals) and sub-items イ, ロ (Japanese syllabary). With an overseas format system the same lines are numbered as Section 1, (a), (i) and so on (see Overseas formats).
| What you write | How to write it | Example of the number shown |
|---|---|---|
| Document title | # 就業規則 (work rules) |
— |
| Chapter | ## 総則 (general provisions) |
第一章 (Chapter 1) |
| Article | ### 目的 (purpose) |
第1条(目的) (Article 1 (Purpose)) |
| Paragraph | - この規則は、… |
2, 3… (the first paragraph is not numbered) |
| Item | Under a paragraph, indented by two spaces: - 正社員 |
一, 二… |
| Sub-item | Under an item, indented by two more spaces: - 有期 |
イ, ロ… |
When you add or delete an article, the app renumbers the articles that follow. To refer to another article in the text, use a cross-reference (next section); it follows the article even when its number changes.
Bracket pair guides: to the right of the line numbers, vertical bars show the extent of each chapter and article. The left column is the chapter and the right column is the article; the bars for the chapter and article with the cursor are darker. Lines inside ::: blocks and indented items and sub-items get vertical lines to the left of the text. When the cursor is on a ::: line, its matching ::: is highlighted too. Under Editor > Bracket pair guides in the settings, you can turn each kind on or off: chapters, articles, ::: blocks, and item and sub-item indentation. All except chapters are on by default. Turning off ::: blocks also removes the indentation inside them.
To give an article a fixed number, write {n=10} after its heading to make it Article 10, or {n=10 b=2} to make it Article 10-2 (第10条の2). For items, write {n=3} or {b=2} (a branch number of the previous item, such as 一の二) at the start of the line. Use this in documents whose numbers do not run consecutively from 1, such as imported statutes.
Adding articles, paragraphs and items with buttons
Click + Article, + Para., + Item or + Sub-item on the toolbar to add a line of that kind after the cursor. Press Tab to demote a paragraph to an item or an item to a sub-item, and Shift+Tab to promote it.
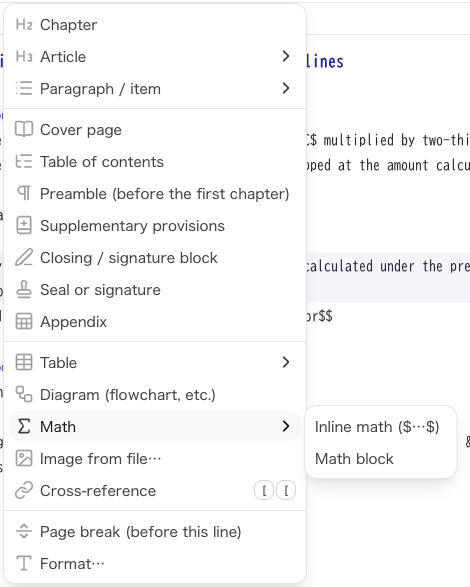
Insert lets you add everything described in this manual: chapters, articles (branch-numbered, deleted, or with a set number), paragraphs and items (sub-items, set numbers, branch numbers), a cover page, a table of contents, a preamble, supplementary provisions, a closing and signature block, seals and signatures (chapter 19), an appendix, tables (with merged cells), diagrams (such as flowcharts), math, images, cross-references, page breaks and formatting.
You can also add an image by copying it (for example, a screenshot) and pasting it into the editor, or by dropping an image file onto the editor. The image is saved in images/<document name>/ in the same folder as the document, and a line such as  is inserted. When you save a version, the image is recorded with it and is included in PDF and Word exports. PNG, JPEG, GIF and WebP files up to 20 MB are supported.
Cross-references: referring to other articles
Type [[ in the text to see a list of articles. Choose one to insert a reference such as [[適用範囲]]; in the preview and printout it is replaced by the article number, such as "第2条" (Article 2). If articles are added and numbers shift, the reference keeps pointing to the right number.
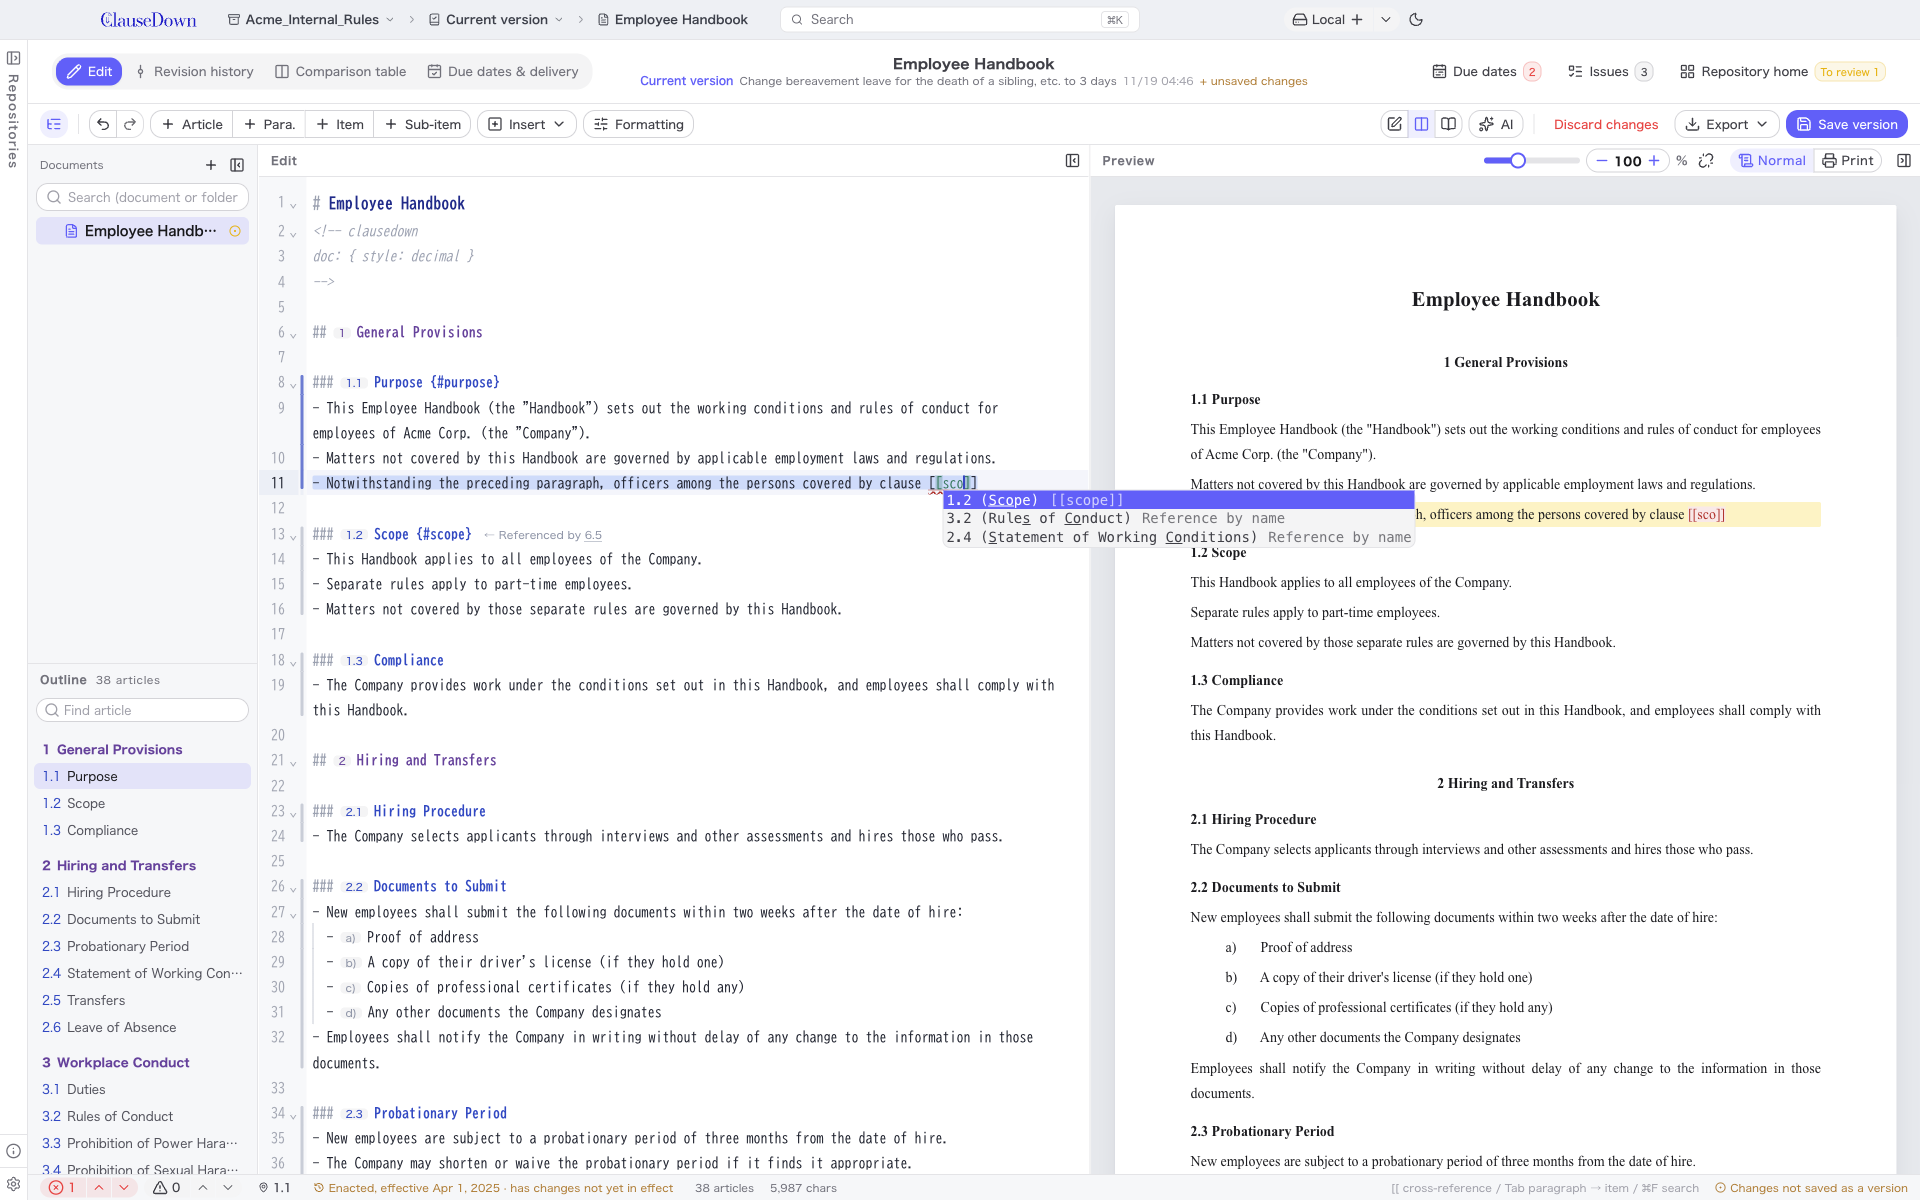
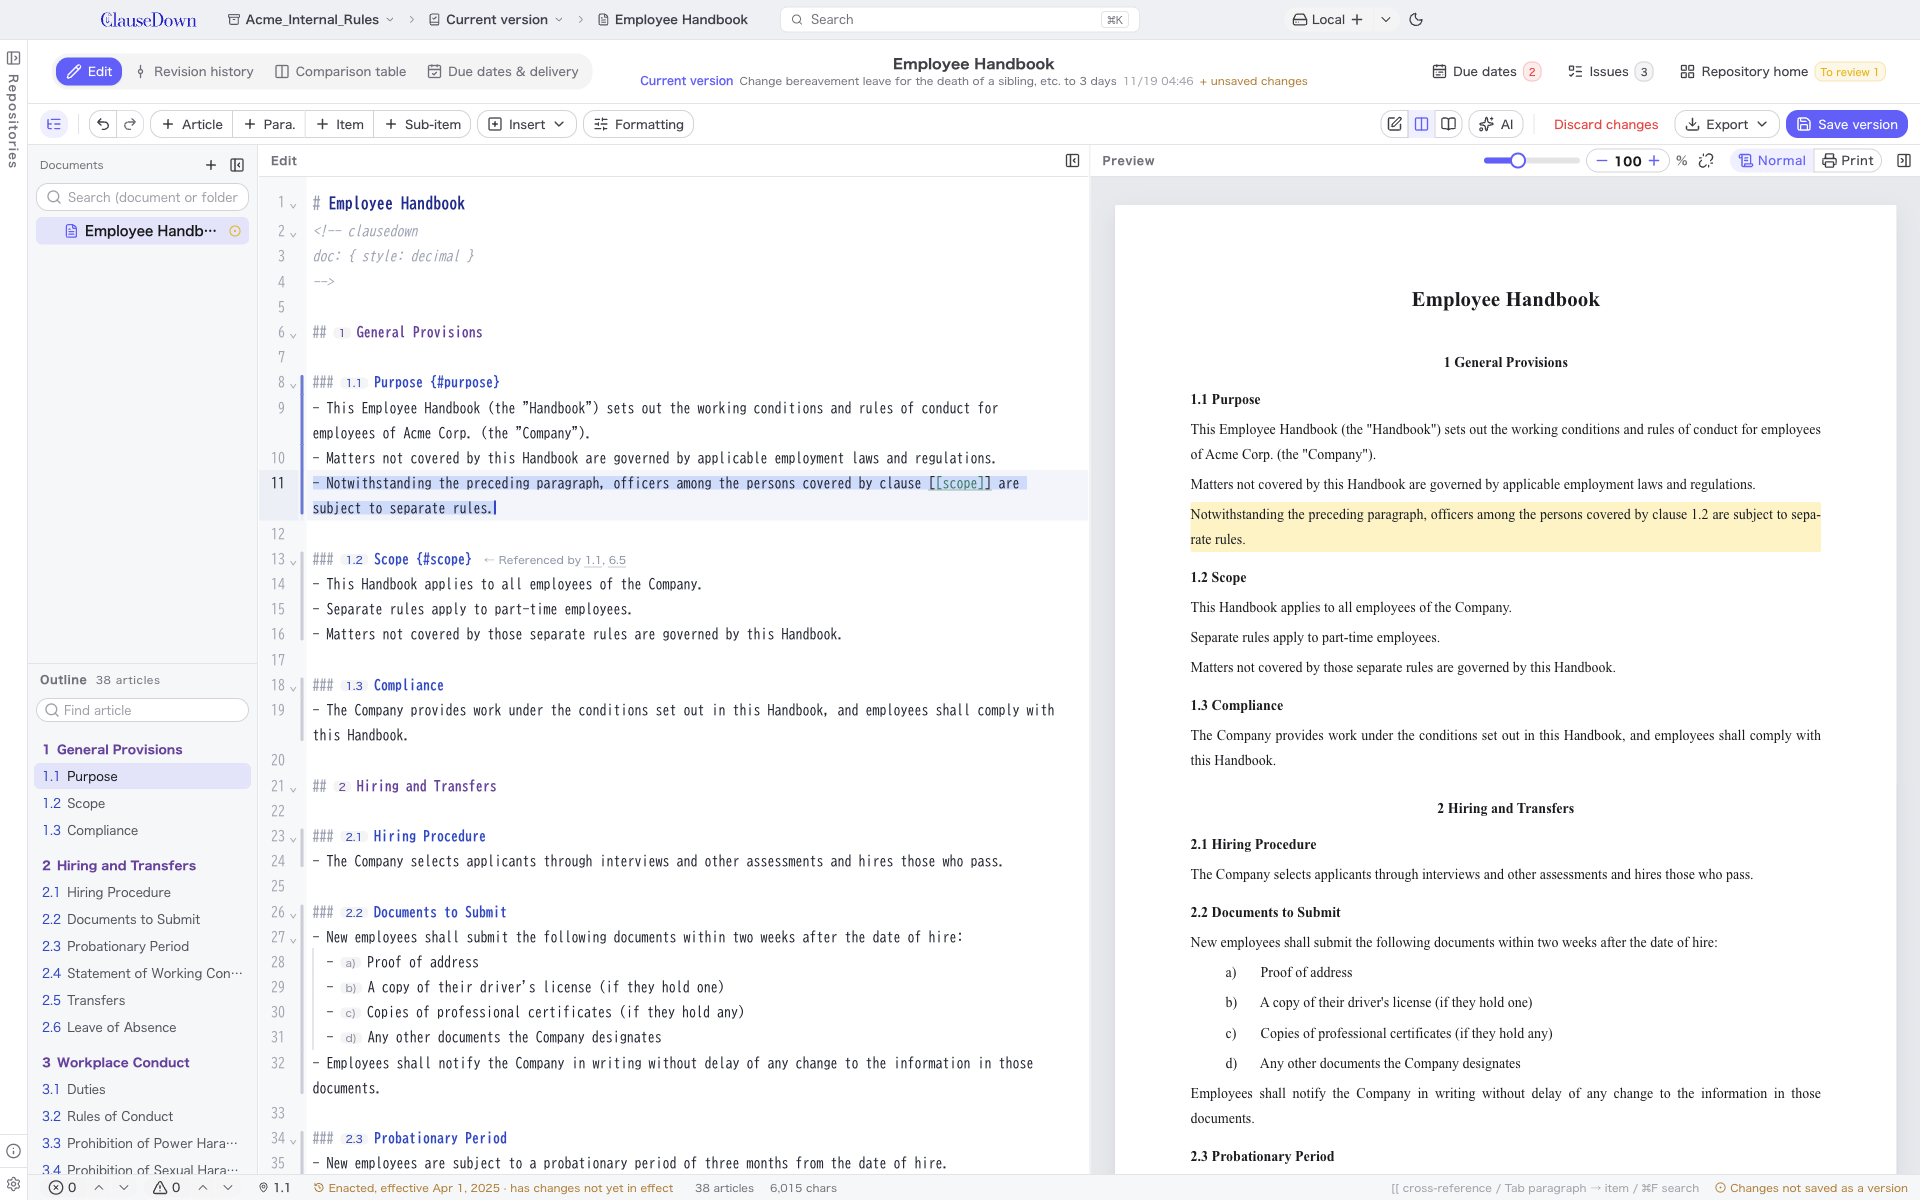
The image below shows a third paragraph added to Article 1 with + Para. and a reference to Article 2. In the preview, the reference appears as "第2条". + unsaved changes below the title means the version has not been saved yet.
If the referenced article cannot be found, or two articles have the same name, the reference is underlined.
Cross-references also work in article headings. For example, ### [[目的]]の特例 ("special provisions to [[Purpose]]") is shown as "(第1条の特例)" ("(Special provisions to Article 1)").
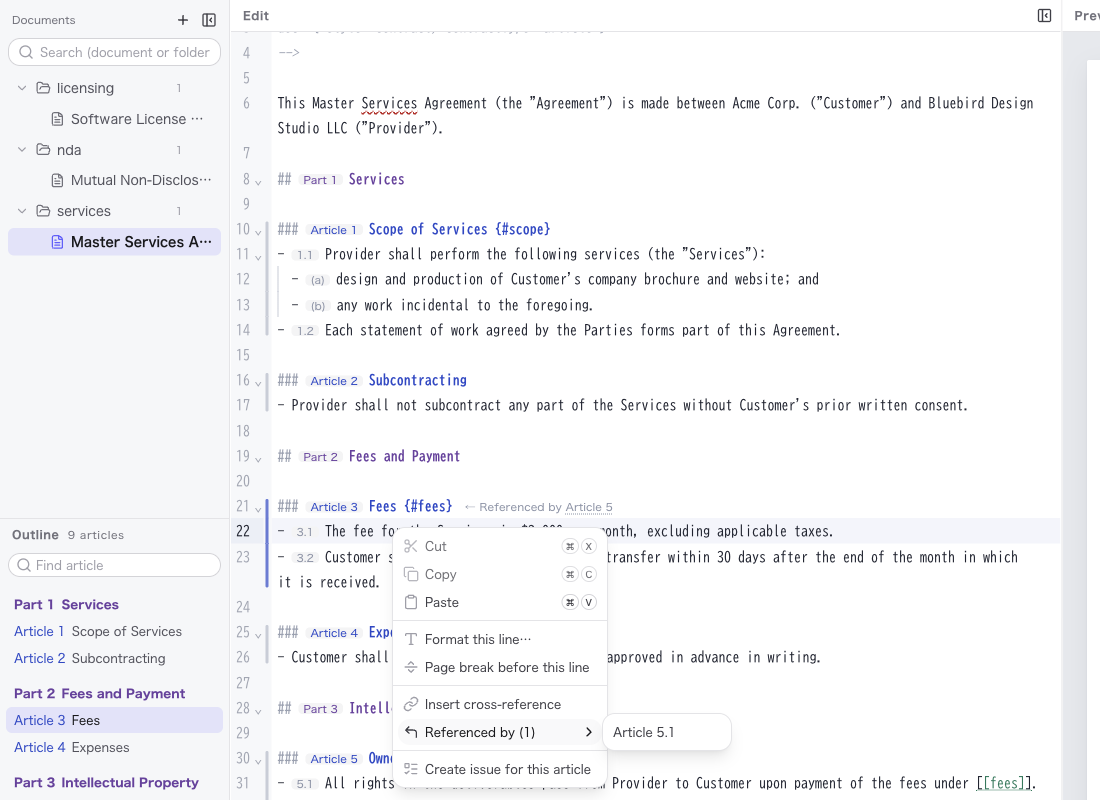
Referenced by: When an article is referenced from other articles, the heading line in the editor shows "← Referenced by Article 2, Article 3" on the right. Click an article number to jump to the line that references it. Right-click an article and choose Referenced by to see a list of the paragraphs and items that refer to it, and jump to the one you choose. If you delete an article that is referenced elsewhere, the app tells you the reference no longer has a target. Only references written with [[…]] are counted; numbers typed directly, such as "第5条", are not.
Amendment history of an article
The status bar at the bottom of the editor shows, to the right of the current article, the effective version in which that article took its present form, for example "Amended, effective April 1, 2023". An article that has existed since the first effective version is labeled Enacted, and one added in a later effective version is labeled Added. If you have changed the article since the last effective version, "· has changes not yet in effect" is appended. A document with no effective versions shows Not yet in effect.
Click it to open the amendment history of that article.
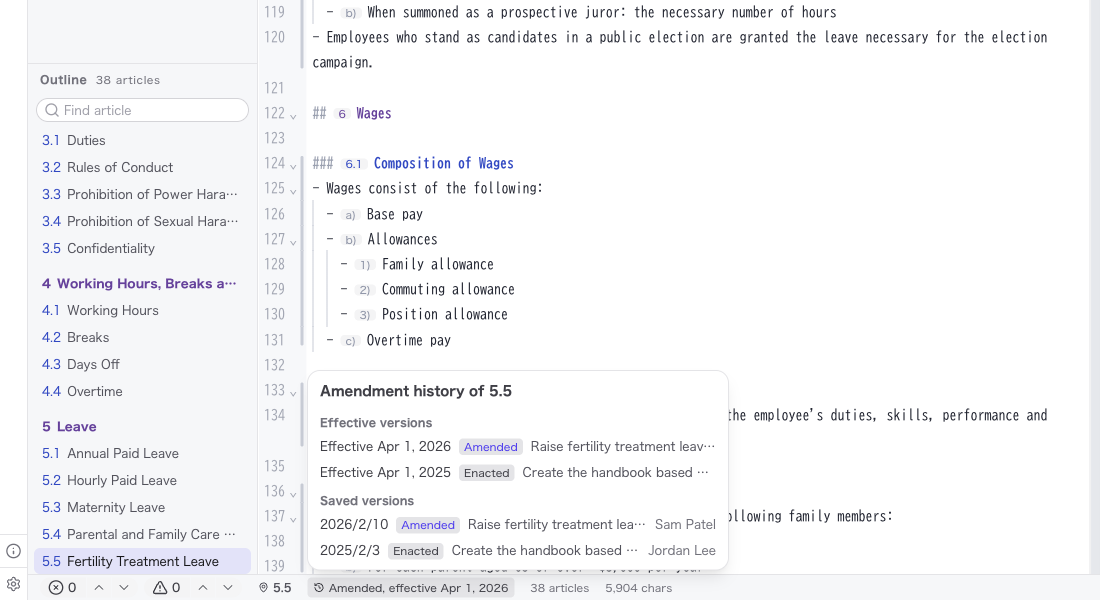
- Effective versions: The effective versions that enacted, added or amended the article, newest first. Click one to open it on the Due dates & delivery tab.
- Saved versions: All versions that changed the article, including those without an effective date. Click one to open it in the revision history.
An article whose number only shifted because other articles were added is not counted as amended. An article is treated as the same article if it has the same {#name}, or otherwise the same heading.
Defined-term checks
For terms defined in the text, the app draws a red squiggle in the following cases. Hover over the squiggle to see the reason.
- The same term is defined twice.
- A term defined with a "hereinafter" clause is used before its definition. (A term defined with "means" applies to the whole document, so using it earlier is not flagged.)
- A term is defined but never used.
In Japanese text, "hereinafter" definitions look like (以下「甲」という。) and "means" definitions look like 「消費者」とは、.
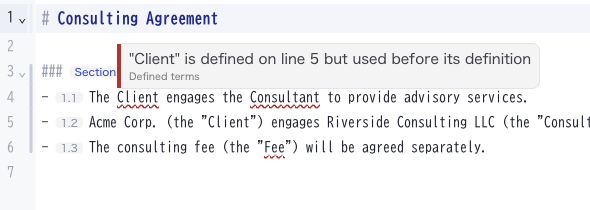
In this example, "Client" and "Consultant" appear in paragraph 1.1 before they are defined in paragraph 1.2, and "Fee", defined in paragraph 1.3, is never used. In English text, definitions such as (the "Client"), (each, a "Party") and "Affiliate" means … are recognized, curly quotes included; plurals (Parties) and possessives (Party's) count as uses.
The same checks apply to English definitions: definitions in parentheses such as (the "Agreement") and (each, a "Party"), and definitions such as "Affiliate" means. Curly quotes (“ ”) are treated the same way. English terms are matched case-sensitively and on word boundaries. Plural forms (Parties) and possessives (Party's) count as uses.
Definitions limited to a scope, such as 以下この項において ("hereinafter in this paragraph"), are not checked, because the scope cannot be determined from the text. Each set of supplementary provisions is treated as a separate scope. A term that appears only as part of another word (for example, 規則 inside 就業規則) does not count as a use. Terms in the title and headings are not flagged even if they appear before the definition.
Proofreading
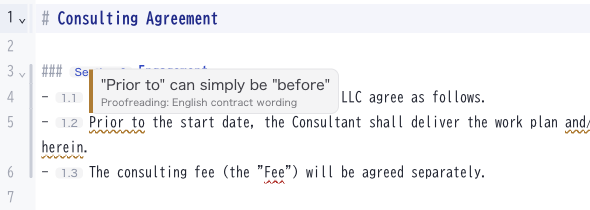
The app draws a yellow squiggle under wording that may need attention. Hover over the squiggle to see the reason and the rule, such as "Proofreading: English contract wording".
Most rules below apply only to Japanese text; the rule for English text is described after the list. They follow the conventions of Japanese official and legislative writing, so the examples are in Japanese.
| Rule | What it flags |
|---|---|
| Repeated particles | The same Japanese particle, such as は, appears twice in one sentence, as in 「甲は乙は」. Because legal sentences are long, repetitions of に, が, の and similar particles are not flagged |
| Ra-dropping | Colloquial verb forms such as 「来れる」「見れる」 |
| Double negatives | Phrases such as 「しないことはない」 ("it is not that it does not") |
| Mixed full-width and half-width | Full-width and half-width Latin letters are mixed in the same document |
| Character usage | Spellings that do not follow official and legislative style, such as 「または」→「又は」, 「および」→「及び」, 「但し」→「ただし」, 「出来る」→「できる」 |
| Legislative character usage | Replacements from the Cabinet Legislation Bureau guidelines on kanji in legislation (「法令における漢字使用等について」, 2010), such as 「捺印」→「押印」, 「虞」→「おそれ」, 「斡旋」「あっ旋」→「あっせん」, 「繋留」→「係留」, 「従って、」→「したがって、」 |
| Legislative okurigana | Okurigana (kana endings) from the same guidelines, such as 「取り消しの」→「取消しの」, 「支払いを」→「支払を」, 「手続き」→「手続」. Flagged only when the word is used as a noun, not as a verb (as in 「これを取り消し、」) |
| Common misuse | For example 「規定を適応する」 (→適用) and 「似て異なるもの」 (→似て非なるもの) |
| Half-width kana | Half-width katakana such as 「カタカナ」 |
| Too many commas | A sentence contains seven or more Japanese commas (、). The limit is set high because legal sentences are long |
| Redundant expressions (off by default) | Phrases such as 「請求を行う」 (→請求する) and 「することができる」. This rule also flags wording that is normal in legal text, so turn it on only when you need it |
English text is checked with the English contract wording rule. It flags ambiguous wording such as "and/or" and "herein", and stock phrases that can be shortened, such as "prior to" → "before". It also flags documents that mix "including but not limited to" and "including without limitation". This rule does not apply to Japanese text.
In documents that use an overseas format, spelling mistakes get a red underline. The spelling language follows the format system (British English for UK legislation and EU regulations; German or French for the German and French systems). Turn this on or off with Check English spelling under Editor in Settings.
Turn off Show proofreading (yellow squiggles) under Editor in Settings to hide all proofreading. Below it is a switch for each rule, so you can choose which rules to use. For Repeated particles, you can change which particles are allowed to repeat (by default に, が, と, の, を and others are allowed). Defined-term errors (red squiggles) are always shown, regardless of these settings. Cross-references, comments in the settings block, {…} attributes and code blocks are not proofread.
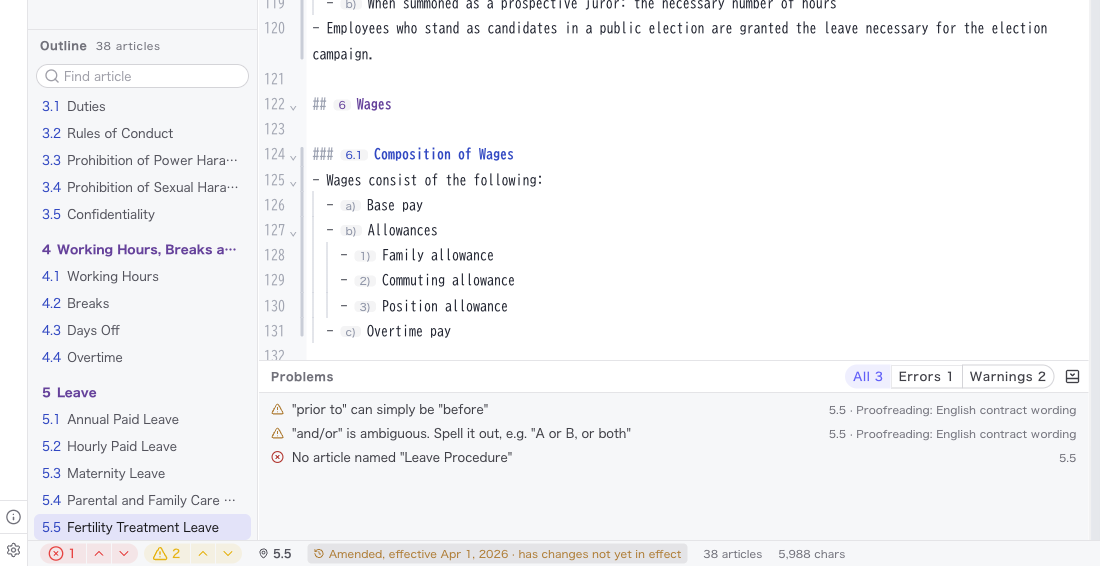
Counts and navigation: At the left end of the status bar at the bottom of the editor are buttons for red squiggles (errors) and yellow squiggles (warnings), each in the form "count | ▲ | ▼". Click ▼ to go to the next problem and ▲ to go to the previous one; the reason appears on the right of the bar. After the last one, it wraps around to the first. Click the count or press Ctrl+Shift+M to open the Problems pane below the editor, which lists all problems. Click a row to jump to it. Use All, Errors and Warnings at the top of the pane to filter, and drag the top border to change its height.
Formatting: changing how chapters and paragraphs are numbered
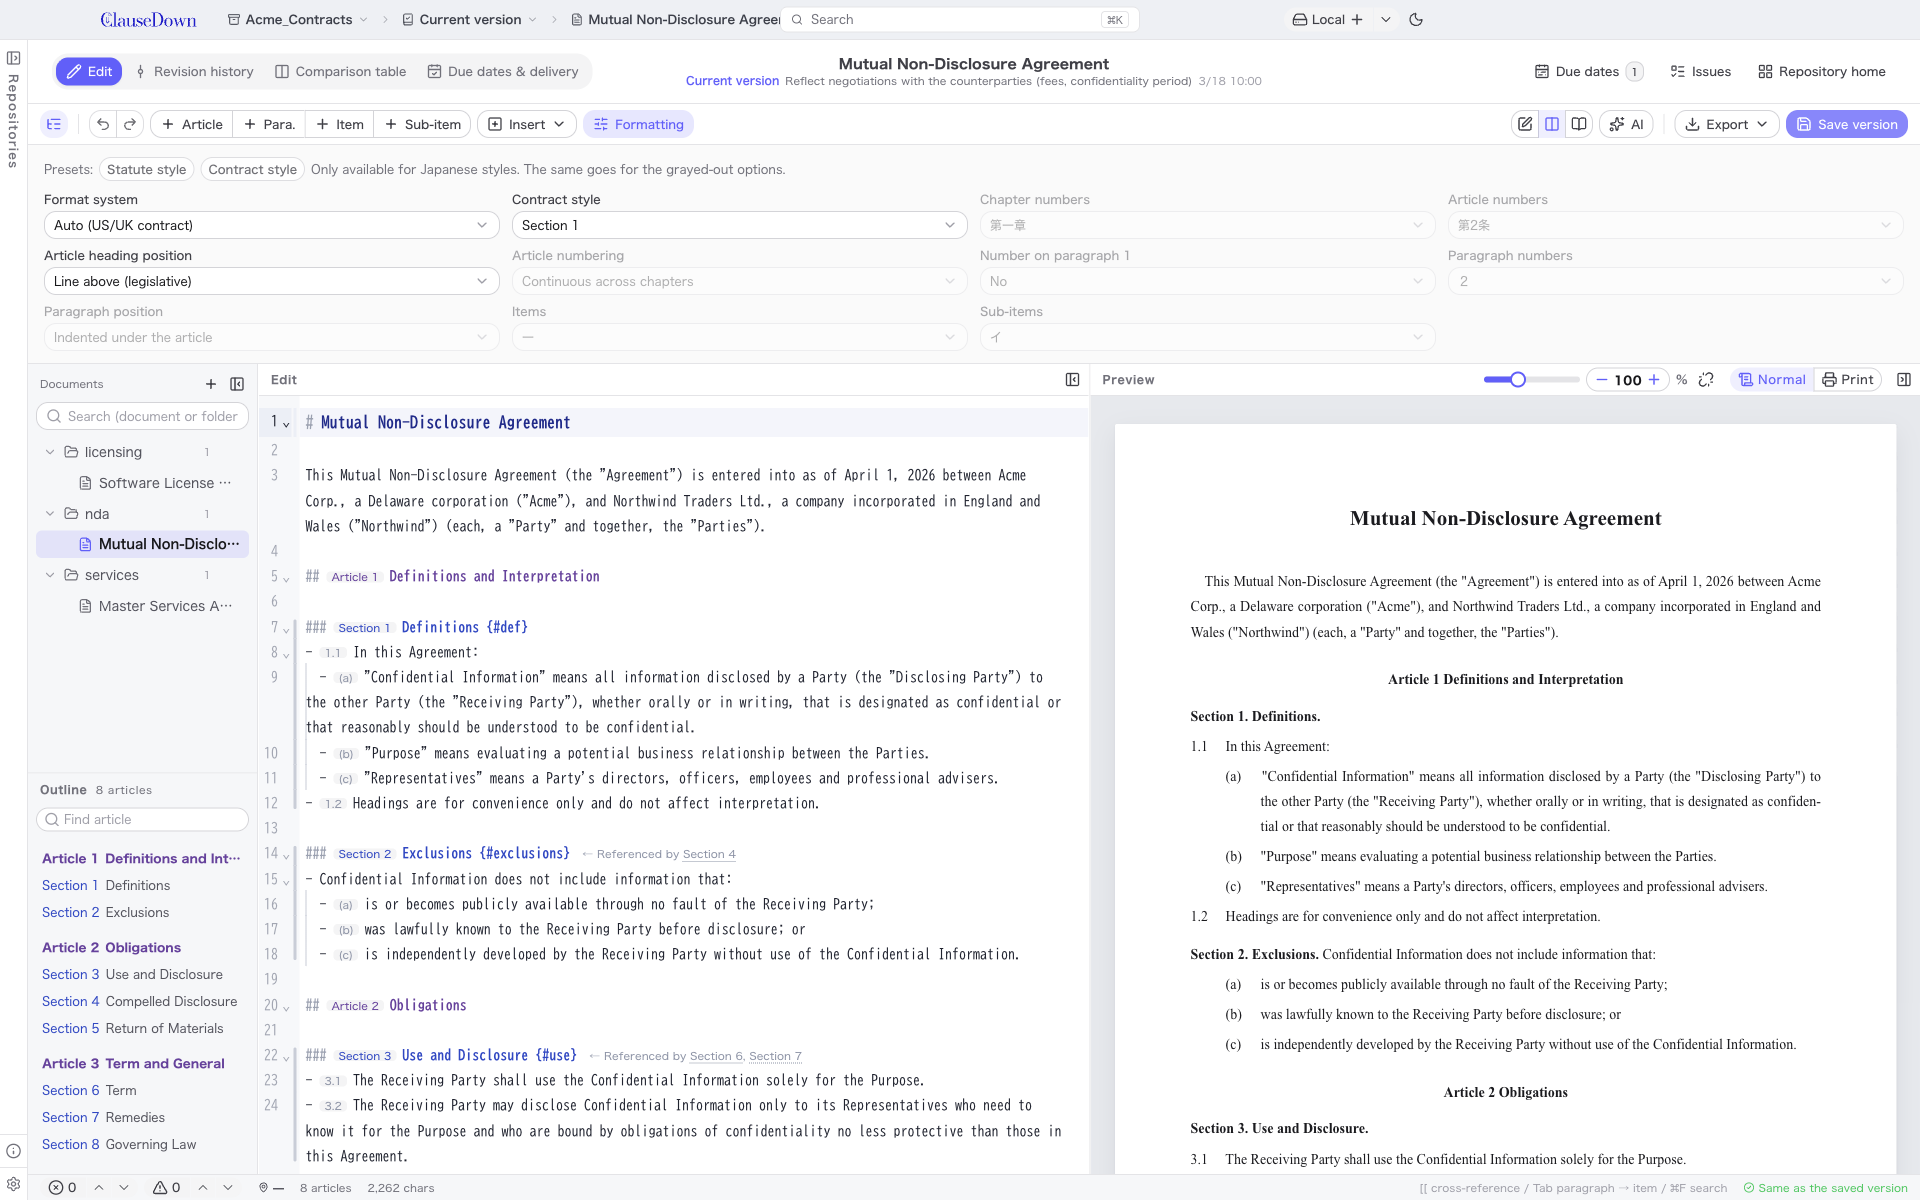
Click Formatting to open the numbering options. You can choose the chapter numbering (第一章, 第1章 and so on), the position of article headings (on the line before the article, or after the article number), how paragraph numbers are written, the symbols for items and sub-items, and more. Click Statute style or Contract style to switch all of these at once. These settings apply only to this document.
Overseas formats
ClauseDown is not limited to Japanese documents. Use Format system at the top of Formatting to choose how articles are numbered and how cross-references are written.
| Format system | Article | Paragraph | Item | Example cross-reference |
|---|---|---|---|---|
| Japan | 第1条 | 2 | 一 | 第3条第2項第1号 |
| US/UK contract | Section 1 | 1.1 | (a) | Section 3.2(a) |
| US legislation | SEC. 1. | (a) | (1) | section 3(b)(1)(A) |
| UK legislation | 1 | (1) | (a) | section 3(2)(a) |
| EU regulation | Article 1 | 1. | (a) | point (a) of Article 3(2) |
| Germany | § 1 | (1) | 1. | § 3 Absatz 2 Nummer 1 |
| France | Article 1er | not numbered | 1° | 1° du deuxième alinéa de l'article 3 |
| Internal rules / standards | 1.1 | not numbered | a) | 3.2 a) |
- The default is Auto. If at least 70% of the text is Latin letters and it is longer than 200 characters, the document is treated as US/UK contract; otherwise as Japan. The field shows the result, for example "Auto (US/UK contract)".
- German and French documents are also detected as US/UK contract in Auto. Choose the system yourself.
- With US/UK contract, use Contract style to choose whether articles are written as "Section 1", "1." or "Article 1".
- Paragraphs are numbered, starting from the first paragraph, only in articles that have two or more paragraphs (the France and internal rules systems do not number paragraphs).
- In systems other than Japan, the Japan-specific options, such as chapter numerals and item symbols, and the Statute style and Contract style presets are not used (they are grayed out).
- The Markdown syntax is the same for all systems. Cross-references can go to any depth, as in
[[name:2:1:3]](article, paragraph, item, sub-item). - In documents with an overseas format, the comparison table uses the document's language for its headings and placeholders (see chapter 9).
- If you open a document with a chosen format system in ClauseDown 0.8 or earlier, a settings warning appears and the document is shown in the Japanese format. The text itself is not changed.
Search and replace
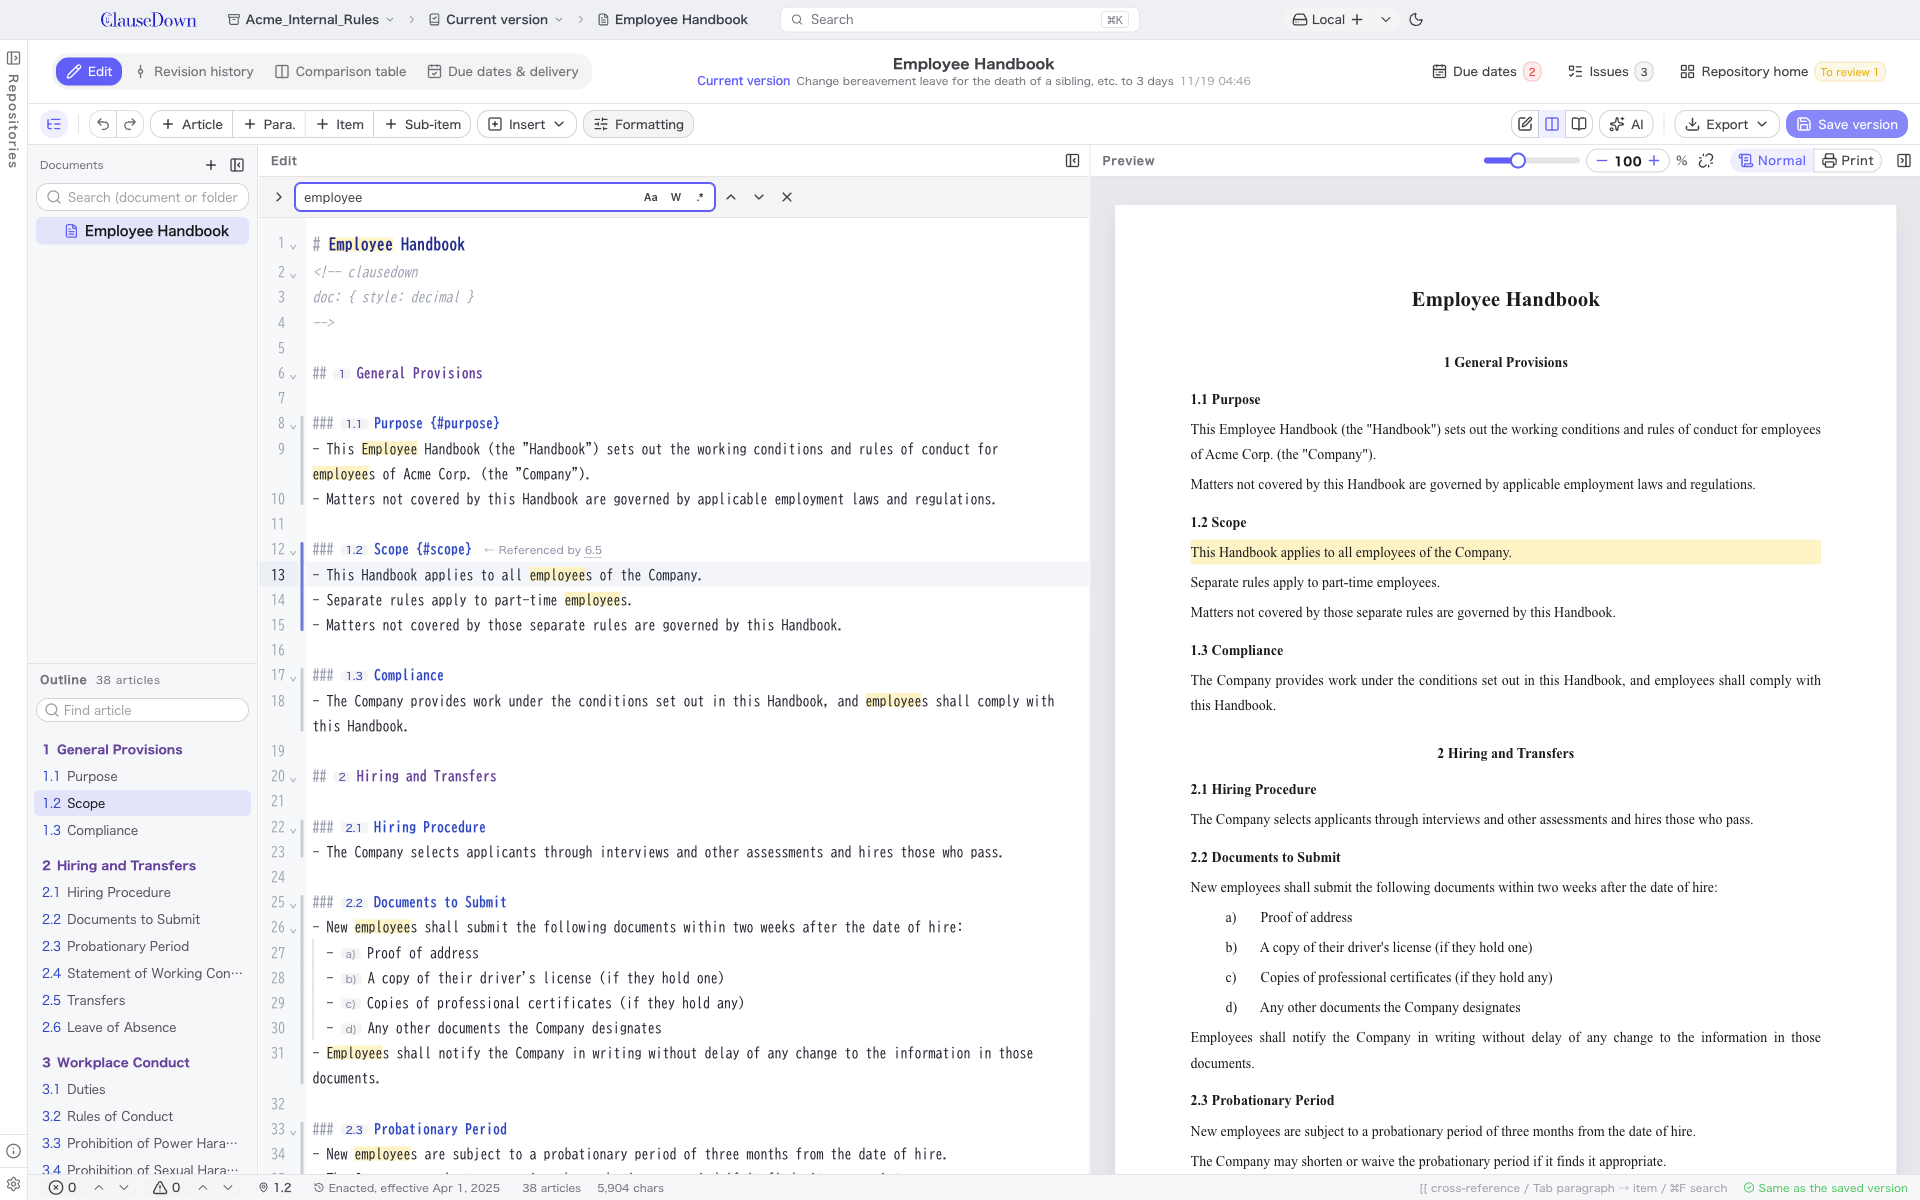
Press Ctrl+F in the editor to open the search bar. Matches are highlighted in the editor, and articles that contain the term are also highlighted in the preview. Click ">" at the left of the bar to open the replace field.
Page breaks, font size and alignment
Settings that plain Markdown cannot express are written in curly braces {…}, using the same syntax as Pandoc. You can type them yourself or add them from the screen.
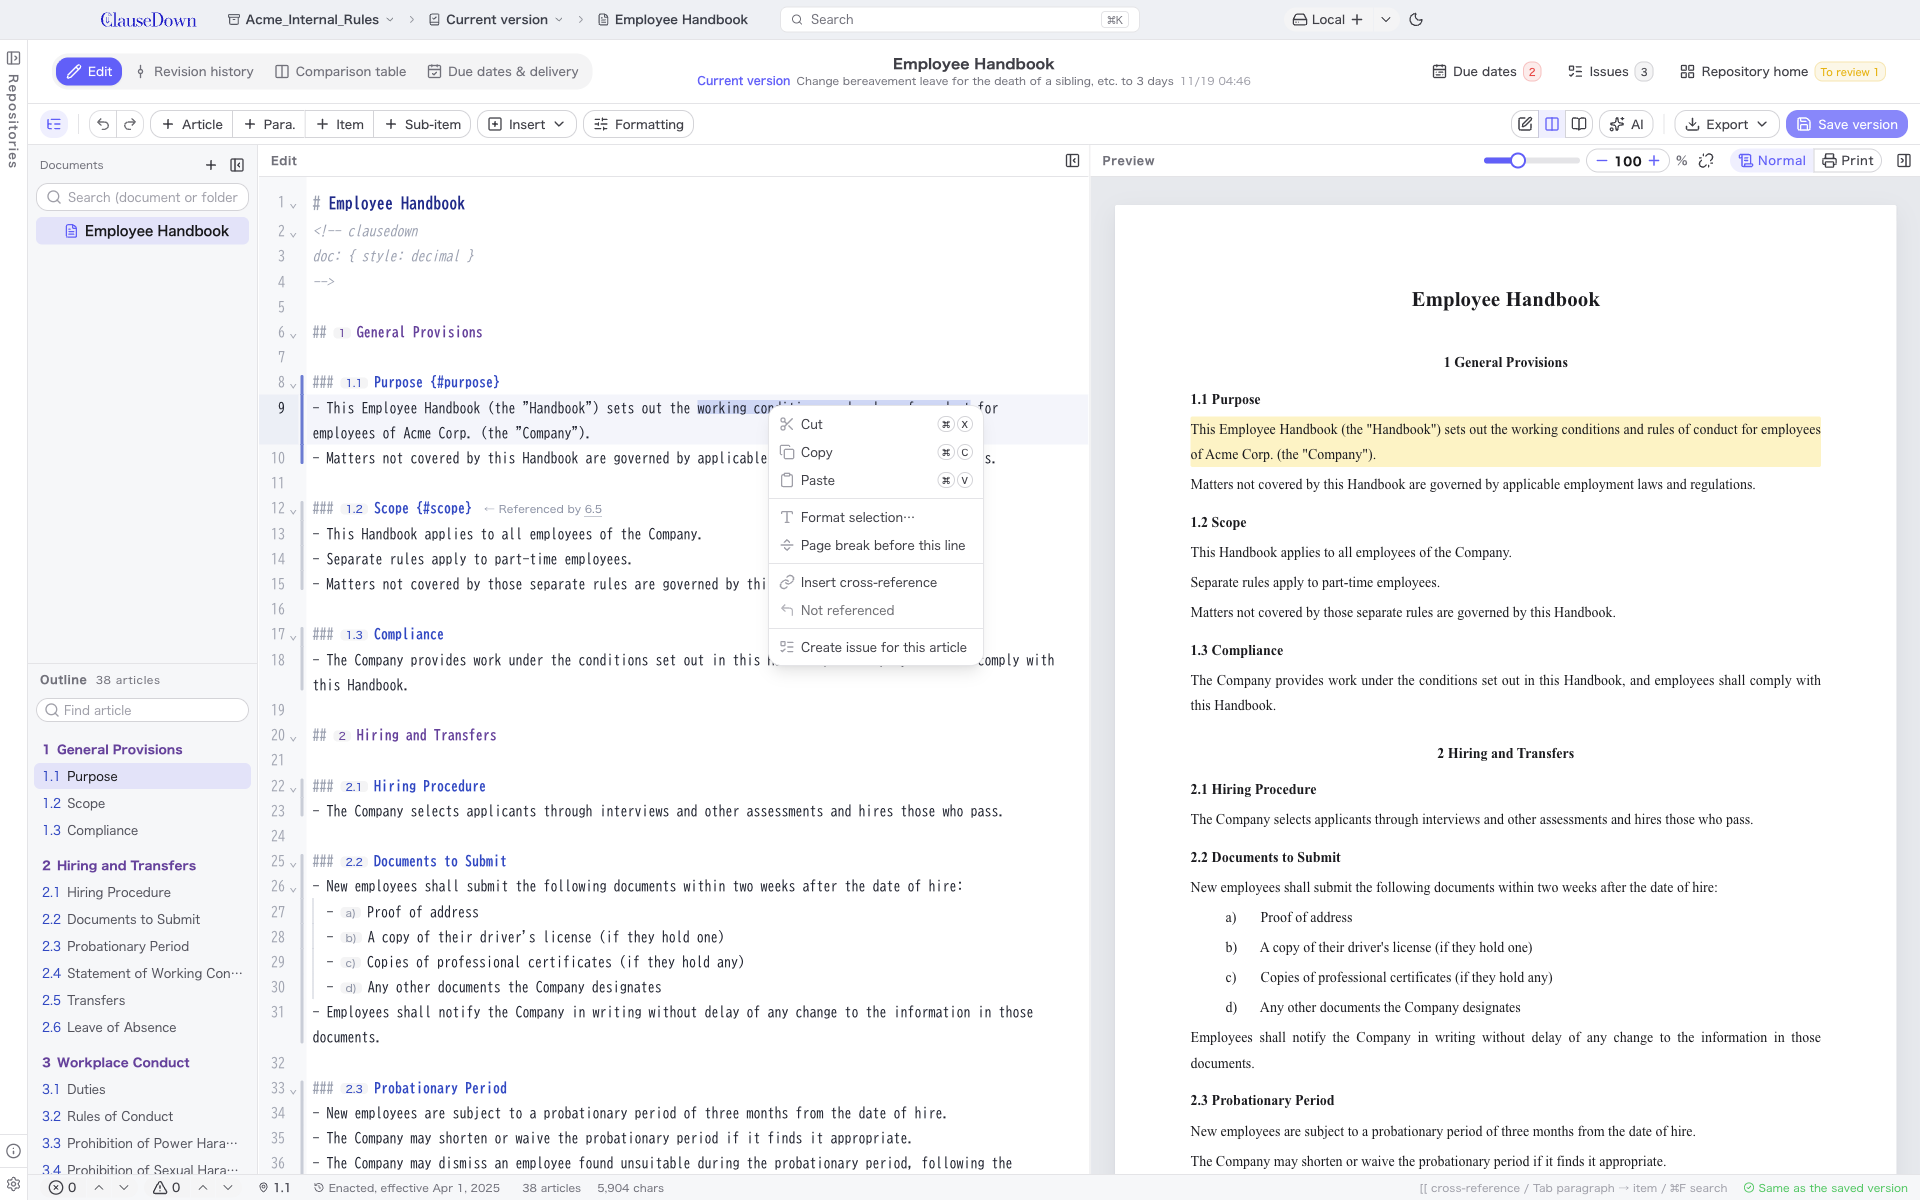
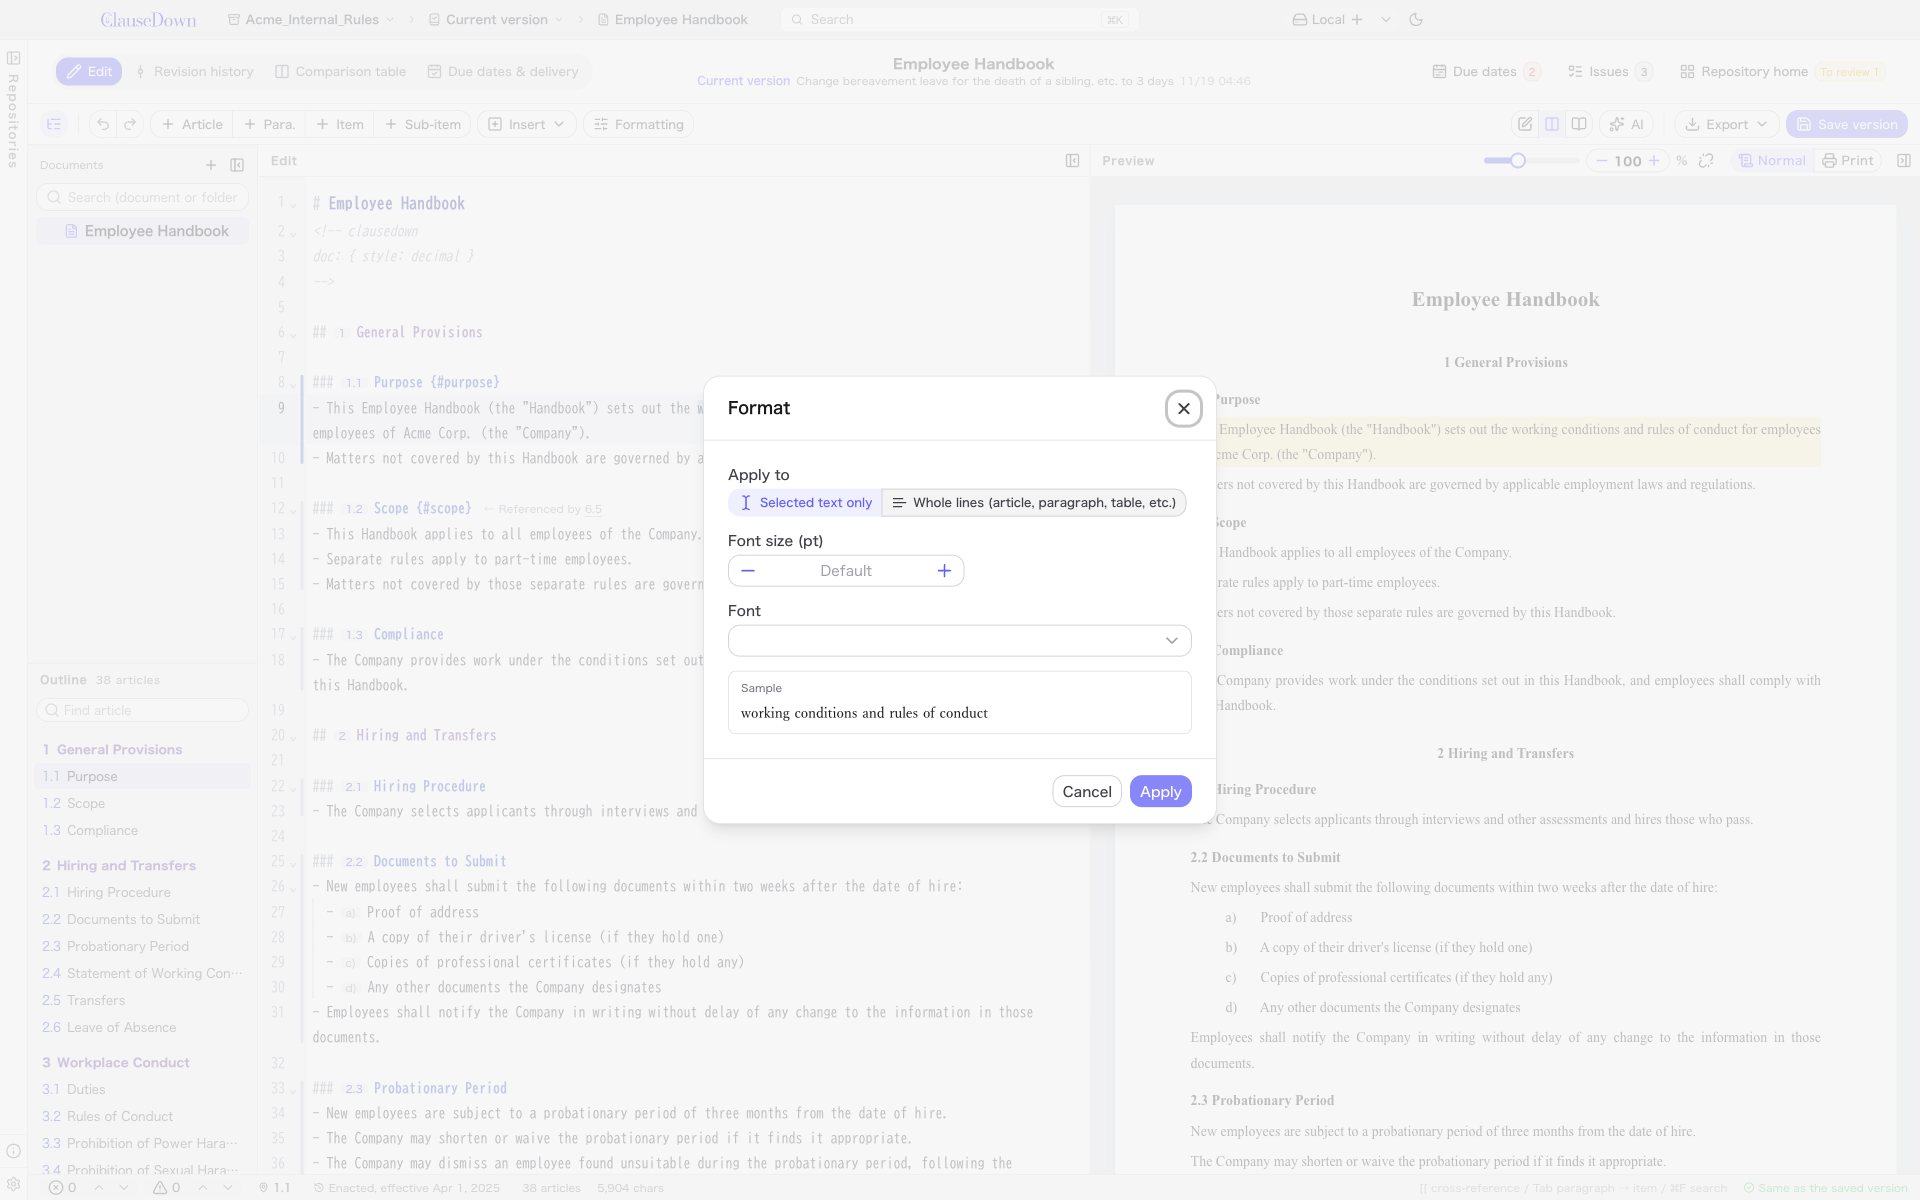
- Select text or lines in the editor, right-click and choose Format selection…. A screen opens where you can choose the font size, font, alignment, line height, table column widths and page break. Check the result in the sample, then click Apply.
- If you selected part of a line, you can choose Selected text only or Whole lines (article, paragraph, table, etc.). With whole lines, the formatting applies to the whole article, paragraph, table or other element.
- If you open it without selecting anything, the formatting applies to the line with the cursor.
- Format… in the Insert menu opens the same screen. Page break (before this line) inserts a page break before the line with the cursor.
- The right-click menu also has Cut, Copy, Paste and cross-reference commands.
| How to write it | What it applies to |
|---|---|
[selected text]{size=12pt} inside a sentence |
The text inside the brackets |
From a ::: {size=9pt} line to a ::: line |
The articles, paragraphs, items, tables or closing lines between them |
A line containing only {right} |
The element on the next line (article, paragraph, item, table and so on) |
A line containing only {break} |
Inserts a page break before the element on the next line |
You can specify the following. To combine several, separate them with spaces (for example {size=9pt right}).
| Option | Example | Meaning |
|---|---|---|
size |
size=9pt |
Font size, in pt, mm, % and so on. A plain number means pt |
font |
font="BIZ UDゴシック" |
Font. Put names that contain spaces in " |
left, center, right |
right |
Alignment |
line |
line=1.4 |
Line height (as a multiple of the font size) |
cols |
cols=25,75 |
Table column widths. A plain number means % |
break |
break |
Page break before this element |
You can also use CSS names such as font-size, font-family, text-align and line-height.
The following example makes the table text smaller than the body text and sets the column widths to 1:3. (The text says "The fee shall be as shown in the following table", with a row for the monthly base fee.)
- 委託料は、次の表のとおりとする。
  ::: {size=8.5pt cols=25,75}
  | 区分 | 内容 |
  |---|---|
  | 基本料 | 月額300,000円(消費税別) |
  :::

These settings are reflected in the preview, PDF and Word. The comparison table ignores them when comparing, so a version that changes only these settings does not show as a change in the comparison table.
Cover page and table of contents
You can put a cover page and a table of contents between the title (the # line) and the first chapter. You can also add them with Cover page and Table of contents in the Insert menu.
# Employee Handbook

::: cover
{right}
Confidential

{center size=26pt}
Employee Handbook

::: {center}
Policy No. 12

Effective April 1, 2026

Acme Corp. Human Resources
:::
:::

[[_TOC_]]

## General Provisions
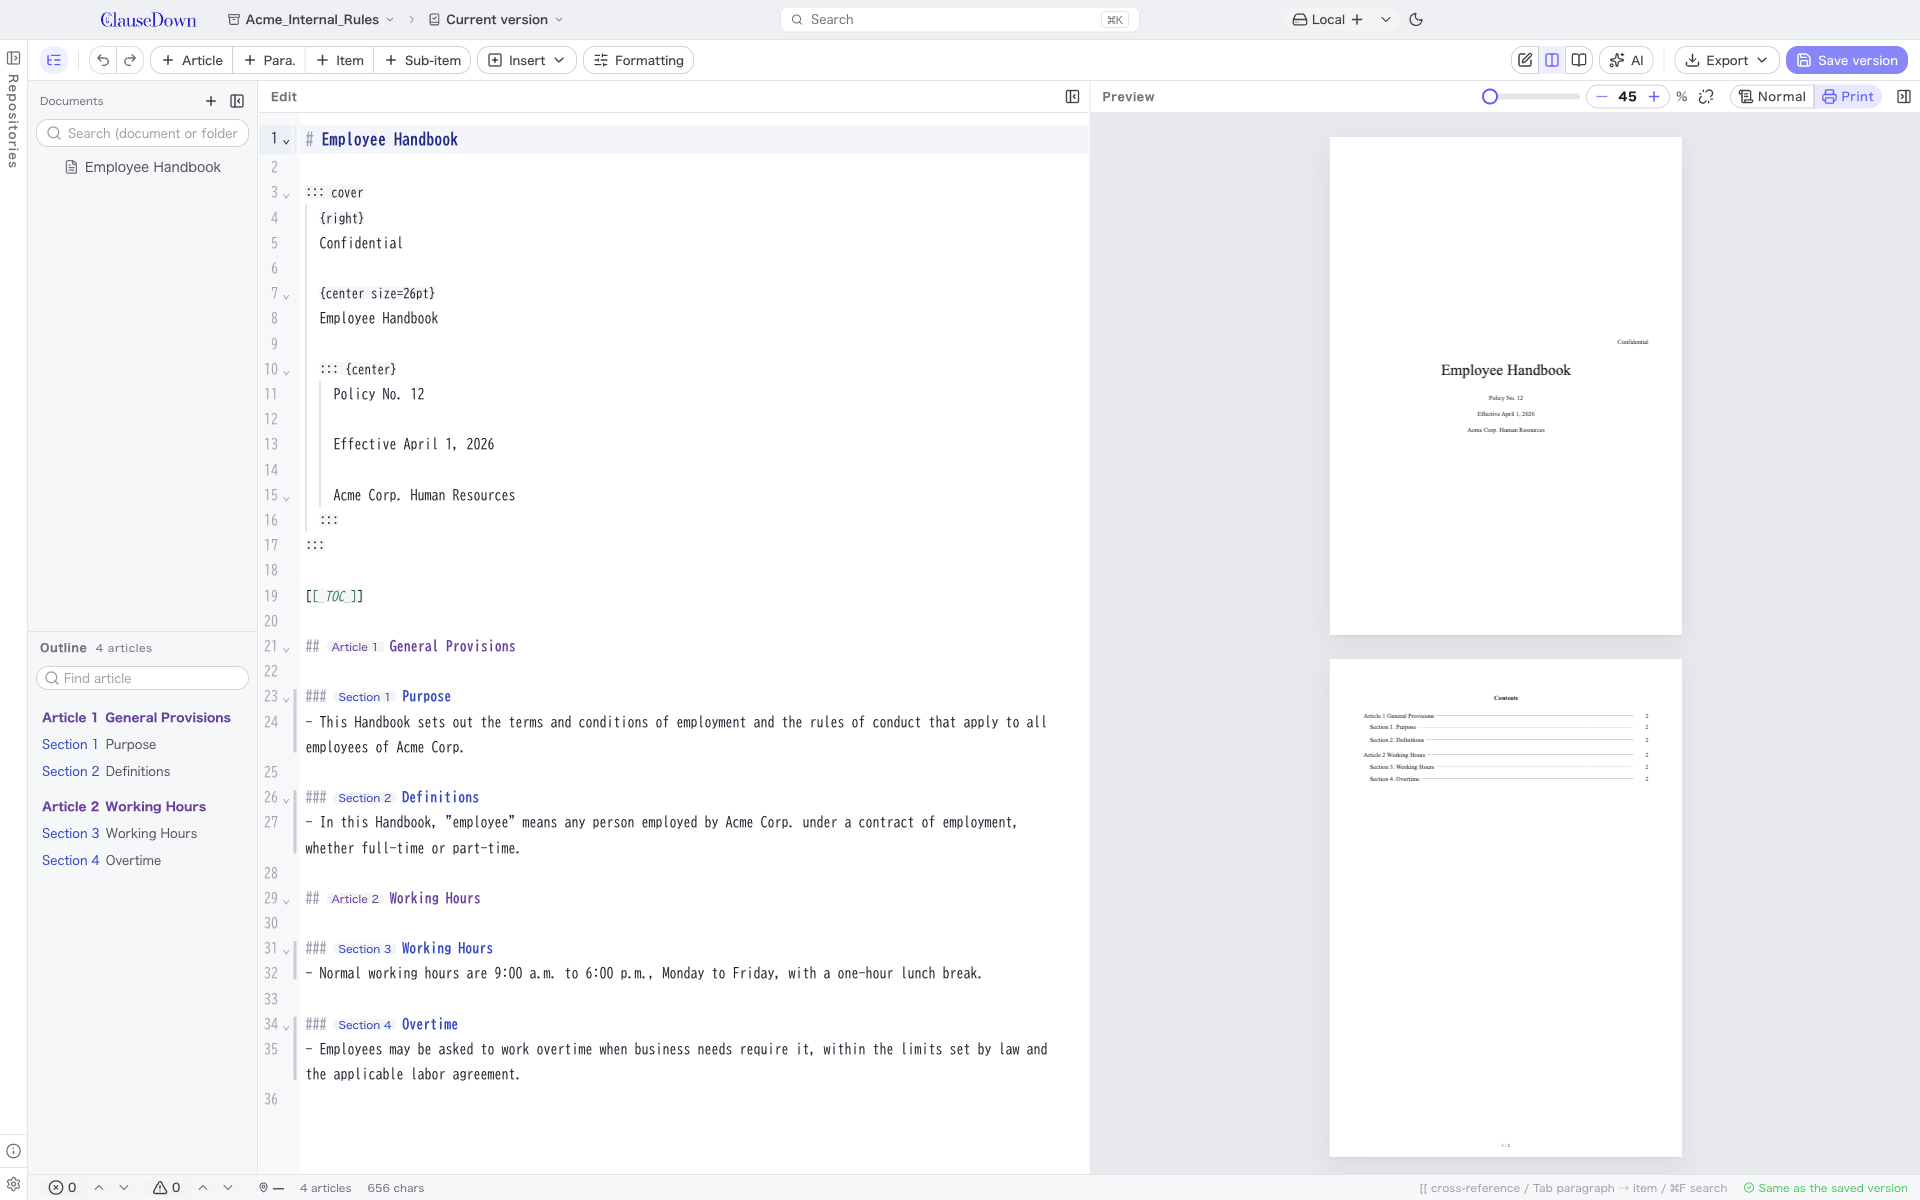
Cover page: everything from the ::: cover line to its matching ::: line is the cover page.
- Write it the same way as the body. There are no fixed fields or layout. You can use attributes such as
{right}and{center size=26pt},::: {center}blocks and images such as a logo. - In PDF, the cover is the first page, centered vertically. It has no page number, and the body's page numbers start at 1 on the next page.
- In Word, the cover is a separate section, centered vertically.
- Insert > Cover page adds a template (confidentiality notice, title, subtitle, date and organization) right after the title. If the document already has a cover page, it moves to that line instead.
Table of contents: a line with only [[_TOC_]] shows the table of contents. This is the same syntax as GitLab, so GitLab also shows it as a table of contents. You can also write [TOC].
- It lists chapters, articles, supplementary provisions and schedules. It leaves out the closing and signature block, and deleted articles.
- In PDF, each entry has its page number on the right, and clicking an entry jumps to that chapter or article. The table of contents gets its own page, followed by a page break.
- In Word, the page numbers are Word fields. When Word asks whether to update the fields that may refer to other files, choose Yes to fill in the page numbers. Ctrl-click (Command-click on a Mac) an entry to jump to that chapter or article.
- In the preview and in HTML exports, entries have no page numbers; clicking one jumps to that chapter or article.
- If you write it right after the cover page (before any preamble text), it comes on a page before the title. If you write it in the middle of the preamble, it appears at that point.
- Insert > Table of contents puts it after the cover page if there is one, or right after the title otherwise.
Notes
- A document can have one cover page and one table of contents. A second one, or one after the first chapter, produces a warning and is not treated as a cover page or table of contents.
- The comparison table does not show the cover page or the table of contents, and the houritsu export leaves them out.
Merging table cells
Write only > in a table cell to merge it with the cell to its right, or only ^ to merge it with the cell above. This is the same syntax as the extended table syntax of Markdown Preview Enhanced, a VS Code extension.
| 区分 | > | 内容 |
|---|---|---|
| 正社員 | 月給 | 期間の定めなし |
| ^ | 時給 | 試用期間中 |
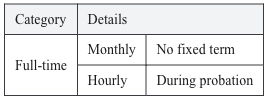 In this example, the first header cell (区分, "category") spans two columns, and 正社員 ("full-time employee") spans two rows.
- The text that is kept is the one in the top-right cell of the merged block.
- You cannot merge across the header row and body rows.
- Merged cells are reflected in the preview, PDF and Word. The comparison table compares tables with the merged-away cells removed.
- When you import houritsu statutes, merged cells are kept using this syntax.
Writing math
You can write formulas, such as the calculation of a subsidy amount or a pro-rata formula, in LaTeX notation. They are displayed as math in the preview, printout and PDF. You can also insert them with Math in the Insert menu.
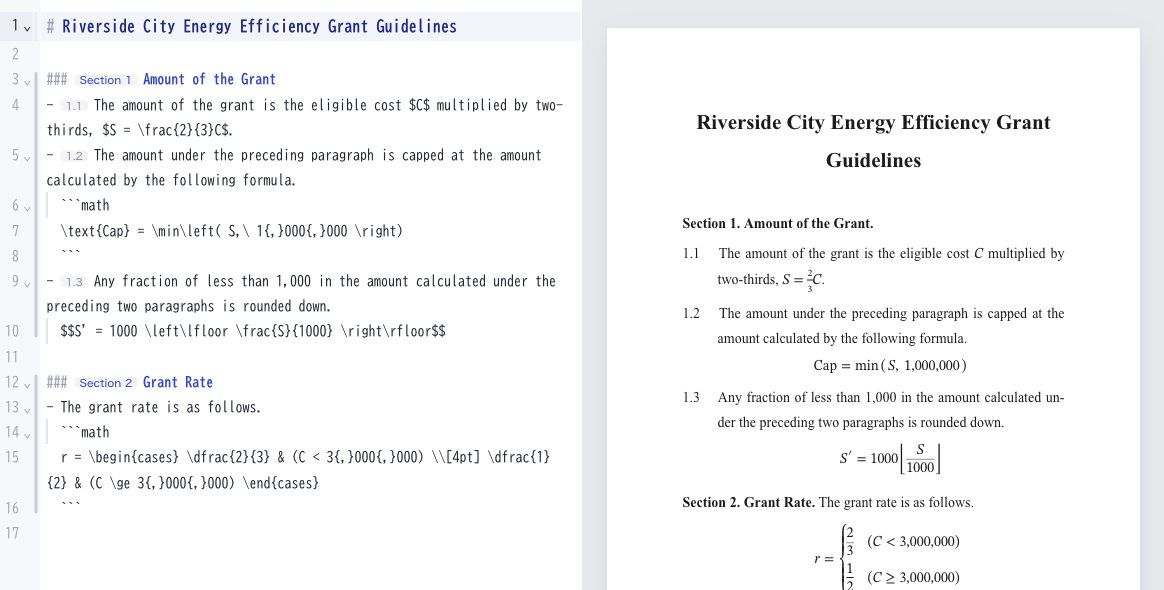
| How to write it | Result |
|---|---|
$S = \frac{2}{3}C$ inside a sentence |
Math within the sentence |
$$S = \frac{2}{3}C$$ alone on a line |
The line becomes a centered math block |
A ```math block |
A math block. Use it for long formulas or cases (\begin{cases} … \end{cases}) |
- Put Japanese (or other) words inside math in
\text{}, as in\text{上限額}("maximum amount"). - A
$in an amount such as "US$1,000" is not treated as math. If there is Japanese text between two$signs, or the closing$is followed by a digit, the text stays as ordinary text. To write a literal$, type\$. - If the syntax has an error, a yellow squiggle appears in the editor and the preview shows the reason.
- When you export to Word, math blocks are inserted as images. Math within a sentence is inserted as its source text (
S = \frac{2}{3}C). - Math is converted with Temml and displayed with the OS math font (STIX Two Math on macOS, Cambria Math on Windows).
Exporting to PDF, Word and HTML
Choose a format from Export to open a screen where you choose where to save the file.
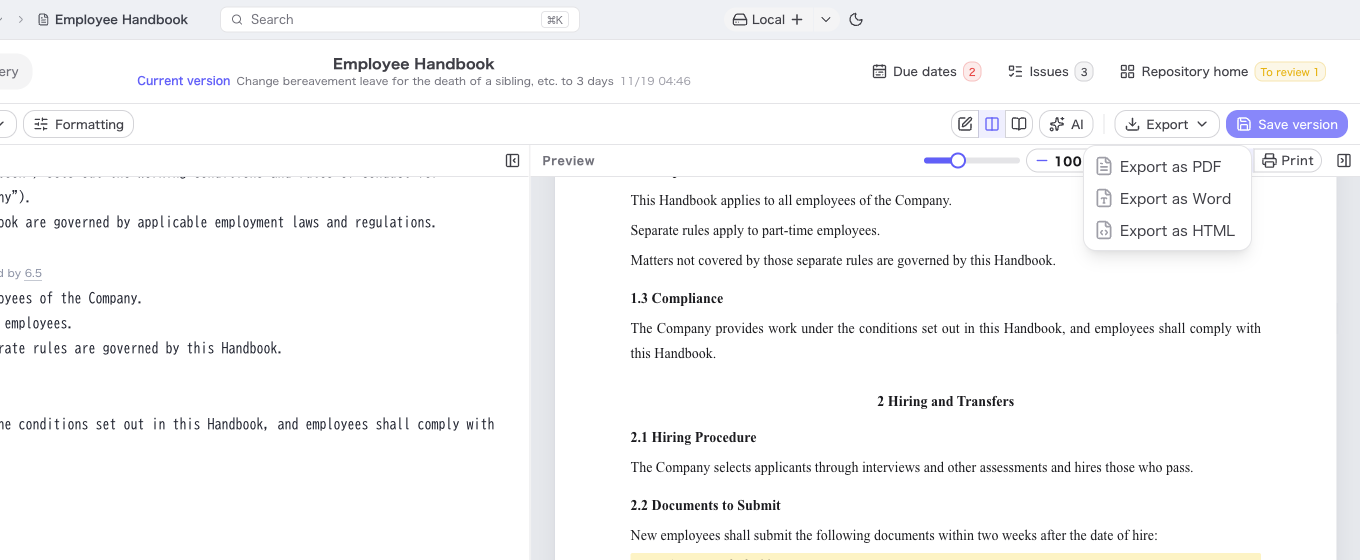
- Export as PDF, Export as Word: Exports the document as it will look when printed. Set the font, font size, margins and so on in Print, PDF and Word formatting in Settings (chapter 17).
- Export as HTML: Creates an HTML file that looks the same as the preview. Images are embedded in the file, so the single file opens in a browser.
- Export as Markdown (houritsu): Creates Markdown with the article and paragraph numbers written into the text. This appears in the menu only when you turn it on under Experimental features in Developer in Settings (chapter 15).
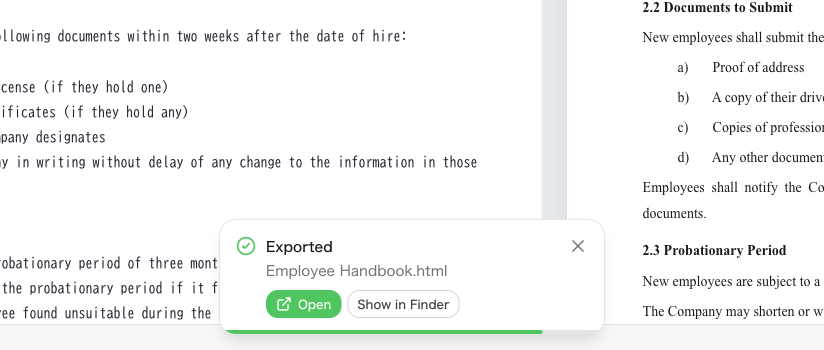
When the export finishes, the file name appears at the bottom right with Open and Show in Explorer (Show in Finder on a Mac) buttons. Open opens the file in the app installed on your computer; Show in Explorer opens the folder and selects the file. The same applies to exporting comparison tables and exporting due dates to a calendar.
How your writing is saved
What you type in the editor is written to the file on your computer automatically about 0.5 seconds after you stop typing. However, it is not yet recorded as a version. To keep a record you can look back at later, click Save version (next chapter). To throw away changes you have not saved as a version, click Discard changes.